Copyright 2024 Electrical101.com All Rights Reserved.
How to Replace a Wall Light Fixture
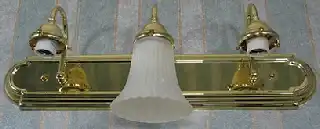
Wall Mounted Light Fixtures
Wall mounted light fixtures are usually mounted on the wall above the sink in the bathroom(s). They are mounted over an electrical outlet box inside the wall and usually have two or more mounting screws to hold the fixture to the wall.
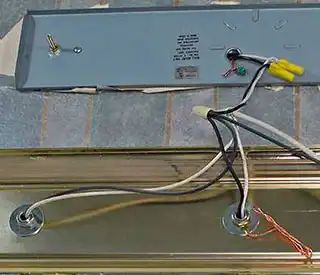
These light fixtures have two basic components, the base and cover. The base is mounted over the electrical box inside the wall. The cover includes the bulb sockets, glass bulb covers, and socket wiring. The cover is usually attached to the base with two or more decorative nuts.
Before Buying a New Wall Mounted Light Fixture
There is something to consider before buying a new wall mounted light fixture. If the new light fixture is smaller than the old one, there could be some old or unfinished paint or wallpaper exposed. If the new fixture is the same size or larger, this should not be a problem.
Decorative nut
How to Replace a Wall Mounted Light Fixture
It will take two people to replace this type of light fixture (one person to hold the fixture cover and the other to disconnect and reconnect the wires. It is possible but very difficult to do with one person.
A shop light (might need extension cord) or headlamp will be needed (unless there is a window that provides plenty of light). The new light fixture kit should contain mounting screws and wire connectors.
Paint or wallpaper might be needed if the new fixture is smaller than the old one.
Tools and Parts List
- Screwdrivers (flat and/or phillips)
- Wall anchors
- Level
- Shop light or headlamp
- Drill and bits (for wall anchors)
- Paint or wallpaper (optional)
- Power needs to be turned off at the electrical panel.
- The bulbs and bulb covers need to be removed (this should lessen the weight of the fixture cover). Since the covers are probably made of glass, care should be taken not to drop them.
- The decorative nuts that hold the fixture cover to the base are removed. Sink stoppers should be closed first so the nuts are not lost down the drain.
- The wires from the electrical box (behind the fixture base) are disconnected from the light fixture wires. If necessary, the ground wire is disconnected from the base.
- The base is removed from the wall.
- Paint and paper are retouched if necessary.
- The instructions for the new fixture should be used for installation.
General Installation Notes
A small fixture’s base can be mounted onto the electrical box. A large fixture should use at least two wall anchors. Existing anchors should not be used unless the holes in the new fixture line up with the existing anchors. Using a level, the base is placed over the electrical box and the anchor locations are marked on the wall through the mounting holes in the base.
The ground wire (if present) usually connects to the base (screw) or cover (wire). Base and cover will both be grounded when the cover is mounted to the base.